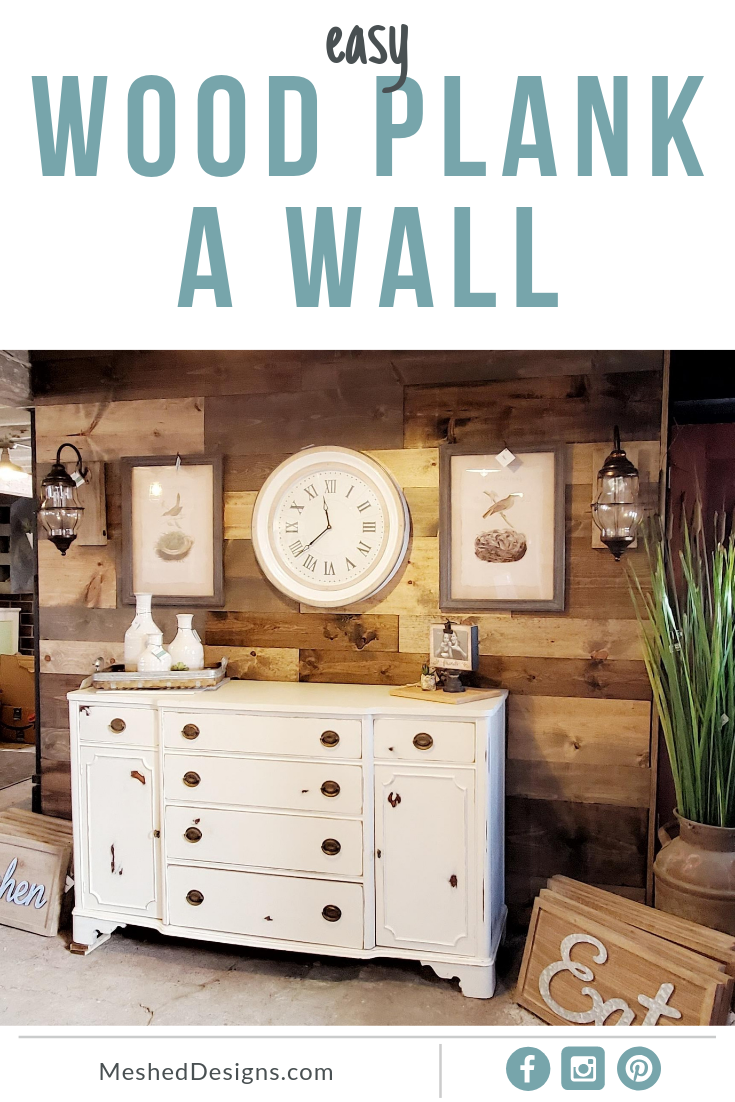
Adding a planked wood wall to any room gives it a whole new feel! Plus there are so many possibilities on what kind of looks you can achieve. Not only that, but oftentimes you may have a wall that isn’t salvageable, meaning; it has a bad wallpaper job, is bare studs, or cracked or broken sheetrock. By adding planking to it, that can all be covered up! I particularly like the mixed stained walls but you can also whitewash them or mix painted planks into it too.
I’ve installed several wood walls in clients’ homes and even incorporated them into the Barn + Loft. With staining and painting, this project can be done in a weekend and cost you about $200 in supplies, depending on the size of the wall of course.
How to Wood Plank a Wall Supplies
- 1 x 6 Standard Pine Boards
- 1 x 3 Select Pine Boards for top trim
- 1 x 2 Select Pine Boards for side trim
- Dark Walnut Stain
- Espresso Stain
- Weathered Gray Stain
- Rags / old t-shirts
- Miter Saw
- Sander
- Nail Gun
- Nails
- Hammer
- Stud Finder
- Level
- Ladder
- Pencil
- Tape Measure
How to Wood Plank a Wall Instructions
- Measure the amount of wood you’ll need. A 1” x 6” x 8’ covers approximately 3 square feet. So if you’re wall is 10’ x 8’ you need 80 square feet of wood, which equals 27ish boards.
( Wall Length x Wall Height ) / 3 = # of boards
Get a few extra boards just in case. - Determine how many trim pieces you need. I suggest always having a top cap next to the ceiling in a 1” x 3” size. This will cover up any unevenness and you won’t have to squish a sliver of a board against the ceiling.
If your wall edge is open, meaning another wall doesn’t come off of it inward 90 degrees, you’ll need a 1” x 2” for the edge to cover the rough sizes of the cut planks. When this is needed, I always mirror the same look on the other side of the wall so it’s symmetrical whether the wall comes out the same or not. - Divide your wood into 3rds (or however many colors you’re doing) and stain the boards. Be sure to cover the edges too, this will hide any gapping that may happen as the wood shifts with your home and climate.
**for this look, I used Weathered Gray but it is a very solid color so while it was still wet, I blended some Dark Walnut into it. Ideally, let the stain dry overnight. - Using your stud finder and level, mark your studs vertically with a pencil up the entire wall.
- If you need to add vertical trim pieces to the edge of an open wall, measure the height and attach it.
- Remove the baseboard trim on your wall. If you have thicker than ¾” trim, you can leave it attached as the boards will sit right on top of it.
- Starting at the bottom, measure your first piece of wood, cut it using a miter saw, sand the edges, stain the edges, level it, nail it to the wall where you marked your studs.
I suggest roughly dividing your walls into rough 3rds and 4ths as you go. This will give you a “thoughtfully” random look. - Measure your next piece in the same row alternating colors and attach.
- Complete the row and continue up the wall with new rows alternating colors.
- Once you get to the top and the gap is less than 2”, cut your top 1” x 3” to the length of the wall and attach it over the top of your last row against the ceiling.
And that’s it! Now you have a beautiful wood planked wall. Some other materials that can be used are, barnwood, pallet wood, or even prefinished flooring.
PIN IT FOR LATER